Showing posts with label character. Show all posts

Tuesday, 11 October 2011

process of the ringmaster 1: eyes

As promised, here's the first of a series of behind the scene posts for the FLIP sting entry we made at Sector5 Studios. I will also use these to compare my skills with the skills i had when making Caged so expect a lot of comparisons.

For this post, I'll focus on the eye as there's a huge leap from Caged. For Caged, the eyes were shaded through basic material colours. For the Ringmaster, I decided to UV map and texture the eyes following the philosophy that the eyes are the first thing the viewer will look at in a character; so it was important for me to kick the bar higher that I set for myself with Caged by putting in effort in to the eyes.

Render comparisons of how they would look in their final state

The results were noticeable straight away but there is still a massive room for improvement as I was treating the Ringmaster as a test subject for texturing the eyes. For example, the iris can be improved a lot in its texture.

the ringmasters eye was originally going to be plain colours which I've labelled Caged style

The next big change is in the blend shapes. In Caged I created blend shapes for the pupil to increase and decrease in size but it still didn't look right. The reason for this was that the iris never changed in size. For the Ring Master I made sure to do this which meant extra blend shapes were needed for the iris, eyeball, and the cornea.
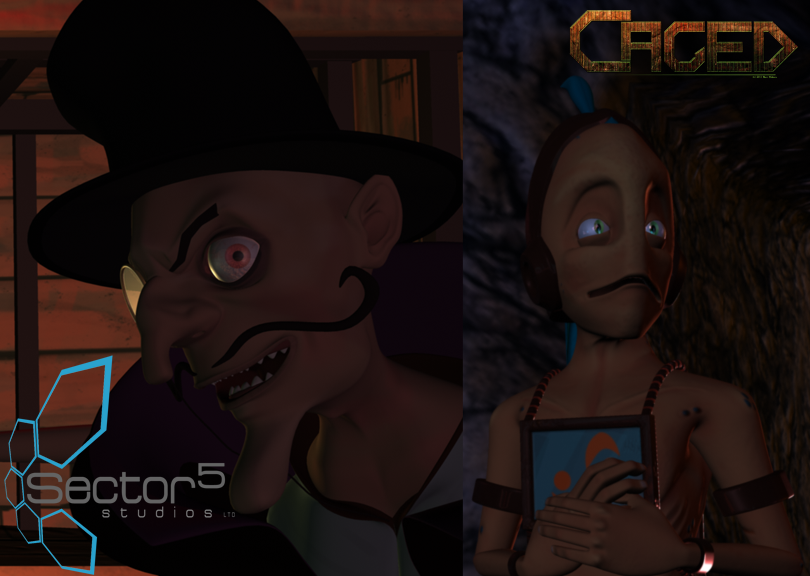

The difference is subtle but pays off in close shots as well as adding to the characters personality. In this case it exaggerates the ringmasters crazy personality with the blood shot eyes.
 Whilst there's a big improvement in the eyes in comparison to the eyes i made for the characters in Caged, there's still a huge room for improvement. Perhaps in the near future, I will have another comparison between a new project and the ringmaster.

You can catch both the FLIP Sting and Caged at this years FLIP festival later this month. For more details visit: http://www.flipfestival.co.uk/

Saturday, 10 September 2011

New 3D project

Now that the Sector5 Studios blog is starting to reveal one of the projects that we are working on, I can at last start to talk about it...a little.

The Ringmaster was teased in a screenshot during the last company blog update. My role was to take the concept art designed by Matt Ayris and to translate it to 3D. This is the first time I've worked on a 3D character who I haven't designed myself and I can definitely see the advantages of it and already the character surpasses what I was able to accomplish in Caged.

As always I begin modelling with the head


The head completed and ready to have geometry mirrored. A rough hat is also
now added.
A great experience in this process was constantly getting feedback on the design and where to improve it which is something I didn't have during Caged since the designs were my own. I'll be updating this blog regularly over the next few days with more development info on this project which is now getting close to being completed.

Sunday, 8 May 2011

Caged completed

It feels really weird but Caged is finally complete totalling at 4 minutes 50 seconds (including credits).

Really excited about showing it this Tuesday for the last presentation in my course (*sniff* If only the course was another year or two longer).

With the completion of the film ,my focus will now be aimed at it's promotion for the student show. With a poster concept ready to be printed, I can start designing the space I will get for the student show (hopefully with a life size cut out too)

Here's another screenshot of the film:


Enzo isn't happy despite his surroundings...


Friday, 22 April 2011

Enzo explores the crystal caves

Another preview of what Caged will look like with this render of the crystal caves.


shiny eyes....

Here, Enzo has followed Bird to keep him safe from the vicious Overlords.

This screenshot is different in the actual film, which is using a different camera angle.

Saturday, 16 April 2011

Caged poster

In preparation for the student show, I've designed the following poster:


This is a design that I've drawn in my sketchbook when I first began the project and before I began blogging so its great to be able to create it in its final form.

The poster also features the logo for the film which I spent today working on since I was taking a break from maya.

Saturday, 26 March 2011

I think I have finally decided to stick with the title Caged for Project Enzo (will feel quite strange not using project Enzo to refer to the film anymore). However you may be wondering why "Caged"?

-Enzo is a slave
-Cage has a connection to birds
-bird himself is trapped in the mines
-The Overlord is also caged within the mechanical forms and insecurity
-Sticks to the one word title I like to give my animations

---

Having finished all development on my characters I began animating last week. I uploaded a work in progress showing the playblasts of the animation I had created on the first day(environments are blocked out):


Caged _ work in progress 1 from Ravi Maheru on Vimeo.

I have made slight tweaks to the animation such as the bird's tail being pushed completely back to streamline the bird whilst it flies. This was simply corrected by adjusting the set driven keys.

Since uploading this video I have animated the first 30 seconds (up until the point where the Overlords startle Enzo, who proceeds to hide Bird in his hands). If there ever was an adrenaline rush in animation, this is the time in production where I have that as I'm having alot of fun animating.

From what I have so far, I really believe that this will be my best film yet, although it means tons of 24 hour days. goodbye sleep...

Also, you may have noticed new music in the work in progress above, thats thanks to Joe Cruickshank, the composer of the film who I have worked with in the past (created the music for Sentry). This will ensure that the music and animation are perfectly in sync. It's a great feeling when the project is updated with new music specifically created for it. I cannot wait to have the finished piece so you can enjoy the animation and the soundtrack.

Wednesday, 9 March 2011

Biolord of Dance!

With skinning complete for each character I now move on to blend shapes.


"How you doing?"
 Seeing as the Biolord doesnt get much spotlight time in the film he was given a brief moment to be on camera and he chose to "dance":


........ahem...back to work...

Sunday, 6 March 2011

Skinning

I'm actually quite surprised how fast I'm progressing through the skinning process for my characters. The last time I had attempted skinning was this time last year on a character test in my free time but I had spent a good 2-3 weeks on the skinning on and off. I'm now getting the skinning of a character finished in a day.


(No more "aghhhhhhh" for me.)  me messing about with the joints whilst skinning the "BioLord"

Friday, 4 March 2011

Progress Report - Project Enzo

The past few weeks have been quite busy and I've made a lot of progress in my film. Here are some quick render tests of my characters who are textured and rigged up:


The characters with textures and bump maps applied


I have also uploaded a new version of my animatic, having scrapped the montage styled time skip in favour of a smaller scene showing Enzo and Bird walking past a map before they are spotted on camera. The reasoning behind this was to make the story clear and remove unnecessary parts from the storyline.

I'm also starting to lean closer to the title of "Caged". I have had this in mind for a while but it didn't feel right at the time. However, I have another reason for this title as it not only represents Bird and Enzo but also the overlords being caged within their own insecurity (which is why they rely on their mechanical forms).

Friday, 11 February 2011

Texturing Enzo

Completed the colour maps and bump maps for Enzo. As for now, I am only having colour and bump maps and anything else I'll control using the material attributes. learnt quite a bit through this process which will help me speed up the texturing for the other characters.

Here's a quick render test, seeing these motivates me to keep working hard.


Added depth map shadows for this render, but without much alteration so the shadows
are not great for now.
As for changes, I'll most likely go back and edit the material attributes on the helment and rings to make them less glass like or least make them a bit worn out, but its not a priority right now.

Tuesday, 1 February 2011

Modelling True Overlord form

This was pretty simple to do, only difficult part during the modelling were the ear like things hanging at the back of his head. This was mainly the topology that I had causing weird alignment for the ears.. But that was solved pretty fast.


Also included the original concept art for comparison


I didn't bother modelling the belly button and other body parts similar to it as I'll do that through texturing like bump maps.

----

My animatic has also changed again after the feedback I received (which were all awesome by the way). The biggest difference is the montage being cut out where it showed Enzo and Bird having fun over a long period of time as it caused confusion amongst viewers. This has now been cut out in favour of introducing Enzo's awareness to Bird's deteriorating health due to the atmosphere of the mines.

Tuesday, 25 January 2011

modelling the Overlord - Complete

Wanted to post this a few days ago but didn't get chance. Here's the basic model of the Overlord complete.


The Mechanical Overlord

Completely underestimated how difficult it would be to model him. Had to jump back and forth from "drawing board" and back to modelling as my initial designs were impractical. This was mainly the joints of the arms and legs. The arms were designed to follow a more organic approach and because they were close to the torso it wasn't gonna allow much room for the arm to move. The moment I would bring it down for a rest pose the arms would conflict with the torso. In the end I went with a ball joint that pushed the arms out a bit to also avoid any conflicts between each mesh.

The legs, which I'm still not happy about yet, were troublesome as I couldn't get the right shapes out of the thigh armour. here's hoping these legs move well. The legs will be quite limited in movement so I don't have to worry about the thigh's spikes conflicting with the torso.

Overall, I'm very pleased with the outcome and how close I've kept it to the original designs. As for the torso vents, I'll sort that out in the texturing phase and also decide if they are necessary.

All that's left now is to model the True Overlord which will a piece of cake compared to the rest of the models ( or maybe I'm underestimating it again, haha!)

Sunday, 16 January 2011

Modelling the Overlord

Started modelling the Overlord now, heres a progress screenshot. His face was a more difficult than I thought, mainly because I kept changing my mind with how I wanted the jaw to be attached. However, since its behind the cloak / hood anyways the joint isnt important. I chose the route that would better assist the animation process so the jaw has a slightly more organic feel.


Overlords mechanical face


Friday, 7 January 2011

Modelling Bird - Complete

Whoa, this took longer than expected. Was hoping i'd get this done by morning but got confused getting the legs sorted out. i was also toying with the idea with adding the forth claw that sticks out at the back of the foot but chose to stick to my original design.


Really happy with the model, I just hope the topology on the wings translate well when animated.

Modelling Bird continued


With his face complete (His eyes are just placeholders for now), I've moved on to the body. This is slightly harder as I havent modelled a bird before so I'm experimenting alot with the topology for the wing as I need to mimic a hand with the three large feathers functioning as fingers. Will be interesting to see if my guesses work in the end.

I'm really proud with how his face turned out, I'm glad that I changed the eyes from what i had originally as these ones will allow me to give him better expressions. I'm also glad I didnt box model him, opting to model it by edges instead, it feels alot easier to sculpt the muscles in the face.

I wish he was real now and sitting on my shoulder, haha! :D

Thursday, 6 January 2011

Modelling Bird

made a start on 'Bird' this morning:


Changed his eyes as birds generally have round eyes
 Having a lot of fun modelling bird, although I really hope choosing to model it by polygons pays off as I could have used a sphere to model from for his head.

Wednesday, 5 January 2011

Modelling Enzo - base model complete


Enzo's base model is complete, now all that's left is modelling the slave gear around him which isn't a priority at the moment. Would have finished this yesterday but the hand gave me a few problems, mainly to do with the aim of having a quad only topology; which for the hand I've never tried before (using a mixture of tri's and N-gon's).

Worked out a quad only topology through experimenting, hope it animates well. What it has let me achieve compared to hands I've modelled in the past, is greater detail for the palm muscles and knuckles. In theory it should allow the hand to crease and bend naturally in the palm which is needed as his hands will be seen alot when holding Bird.

Had fun modelling him, definately the most detailed animation that will be present in the animation. For now, Enzo will take a break whilst I start modelling the other 3 characters. :)

Tuesday, 4 January 2011

Modelling Enzo

here's a progress screenshot of Enzo's model. With the head complete, it doesnt take long to complete the body. After Enzo's modelling is complete, I'll move on to Bird's model.
Enzo so far

Sunday, 2 January 2011

Progress Report 3

its been a while since I last posted, huge thanks to my internet connection messing up during christmas holidays :( Anyways, happy new year and I hope you all had a great christmas too.


Finally resumed work on my final project. Progress on my main character's head (Enzo):


Half of Enzo's head with an incomplete helmet

pleased with his face, got the topology sorted out and I also decided to give him a round eyeball to save headaches later on if I had of stuck to the oval eyeball. Still unsure I will create teeth for him, never included it in original artwork and didnt think about it at all. I will most likely include some but they will be small teeth that wont be seen often. Still have to model the tongue however.

After modelling the face, I started deleting polygons to decrease the ploy count, I think I had around 1000 polygons for half a face which is ridiculous so spent a good amount of time reducing the amount. I now have it around 670 for half a face (would have preferred to have it smaller but I think I should be fine with this hopefully.

I've moved on to the helmet which is a lot harder than I imagined although it's mainly due to how I went about duplicating one helmet band and attempting to remodel it for the next part of the head.

Monday, 29 November 2010

Progress Report 2

Now in the modelling phase at last. I don't think theres any revisions needed for the characters now, besides the mechanical Overlords colour (thats something I'll aim to get fixed before the texturing phase).

An early capture of my work in progress. I have almost completed the face now so next update on the modelling will show a lot more.

With deadlines approaching, I will also begin work on my final 2D animatic (when I say final, I'm talking about the overall quality of the drawings and adding the changes made from latest revisions in the script).

I will also begin work on a 3D animatic, although this will be very rough blocks moving around to represent characters and evironment. The primary aim here is to have the 3D animatic represent the camera angles and positions since the 2D animatic is focued purely on communicating the story.

It's been mayhem lately in trying to get everything balanced out with dissertation, my scientist lip sync and this project but I'm getting there now. With a draft of the dissertation finished, I only have minor edits to do to fix the errors. As for the lip sync, I'm definately going to have to buy my own light box to work with as they are all booked out at university; which I was planning on getting before next year anyways.